Post updated: November 24, 2025
In this manual, we are going to show you how to export, convert and view Slack data with the help of Backupery for Slack desktop application. The complete application description is here, so in this post, we are going to focus on how to use the application.
1. Connect Backupery for Slack to your workspace
1.1 Download Backupery for Slack installer package from the product page.
1.2 Install it on your computer and run the application.
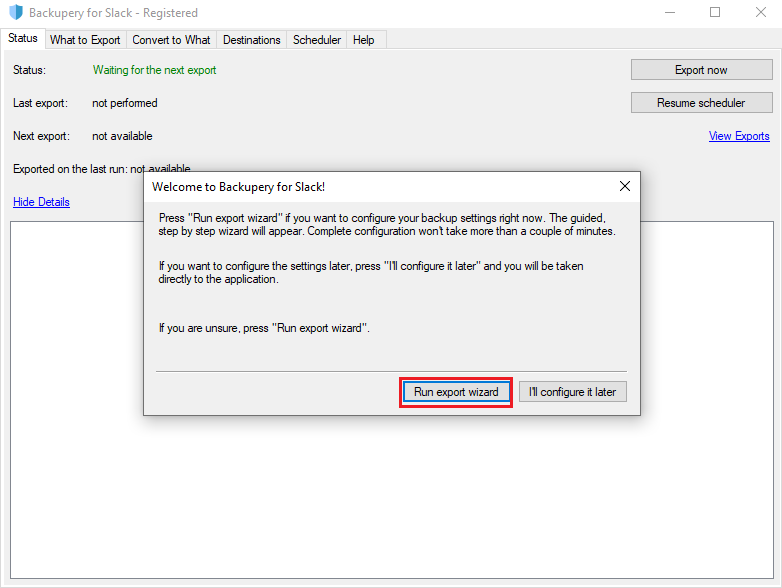
1.3 If you have not configured the application before, it offers you to run the export wizard. Press the Run export wizard button:
Once Run export wizard is pressed, you will see the following screen:
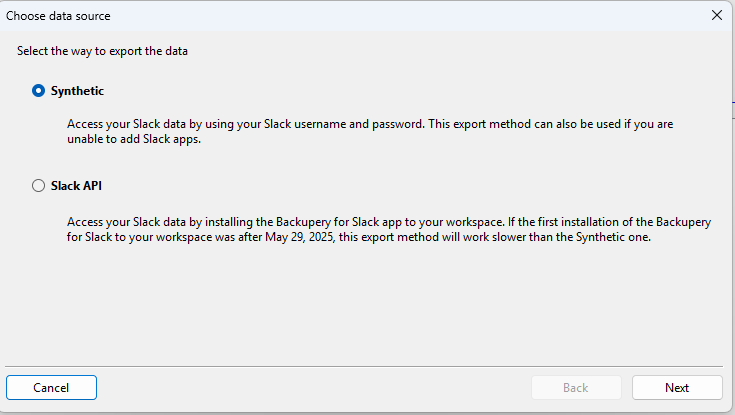
Let me explain what it means. There are two possible ways to connect to your Slack workspace:
- Synthetic. Connect to your Slack account by your Slack username and password. In this case the application will connect to your Slack workspace as your regular Slack client does so it will export messages and files like you do in your Slack client. In other words, you can think of this method as an automatic way of making screenshots and downloading files manually. Please also note, that if you are using the Synthetic export mode, you will not be able to export private conversations (Private Channels and DMs) where you do not participate. Please refer to this article to read more about the Synthetic export mode.
- Slack API. Export data by adding the Backupery for Slack application to your Slack workspace. This export method also allows you to export private conversations (Private Channels and DMs) where you do not participate, though some additional setup is needed (more on this later). Also, if the first installation of the application to your workspace was after May 29, 2025, this export method will work significantly slower than the Synthetic one due to the Slack API rate limit changes.
1.4 Once you’ve selected the desired export method (Synthetic or Slack API), click Next to connect to your Slack workspace. Follow the wizard’s instructions to connect the application to your Slack workspace.
2. Select data to export
Once you’ve connected Backupery for Slack to your Slack workspace, you are ready to select which exact data to export.
By default, the application works on behalf of the user who connected the application to the Slack workspace. So it exports the data (public & private channels, direct messages, group direct messages, files, etc.) related to this user. For example, if the user is in a channel, then the whole channel is exported (including messages and uploaded files of all the members).
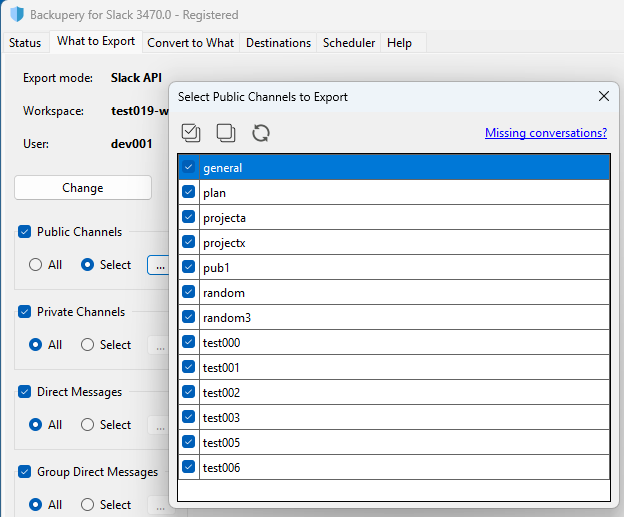
You can review Channels and DMs available to export on the What to Export tab:
However, if you are using the Slack API export method (see 1. Connect Backupery for Slack to your workspace) the application is also able to export the conversations which are related to a user other than the installing user. Here is how.
2.1 Export data of another user. To export all data (public & private channels, direct messages, group direct messages, files, etc.) related to another user (a user that differs from the installing one), it is necessary to add the Backupery for Slack Assistant application to the Slack workspace on behalf of this user. To add Backupery for Slack Assistant, a user should follow the URL below and click Allow:
https://slack.com/oauth/v2/authorize?client_id=59371302183.2082470751077&scope=users:read,users:read.email&user_scope=files:read,groups:history,groups:read,im:history,im:read,mpim:history,mpim:read,users:read,users:read.email
Backupery for Slack communicates with the installed Backupery for Slack Assistants and exports the data of another user.
Example. Assume there are User1, User2, and User3 on a workspace; User1 installs the Backupery for Slack app. We also need to export all the data of User2 (including DMs between User2 and User3 to which User1 does not have access). To export the desired data, User2 should install Backupery for Slack Assistant. Once User2 has added Backupery for Slack Assistant to the workspace, Backupery for Slack will be able to export the following data:
- All conversations (Public Channels/Private Channels/DMs) where User1 participates
- All conversations (Public Channels/Private Channels/DMs) where User2 participates
2.2 Export specific Private Channels where the installing user does not participate. If you don’t need to export data of other users, and are more focused on exporting a private channel where the installing user does not take part in, you can ask somebody from the private channel to add Backupery for Slack to the channel. There are two alternative ways to add Backupery for Slack to a channel.
- Add the app to a channel using the “/invite” command. Arbitrary user who take part in the channel may add the app using the following command:
/invite @Backupery for Slack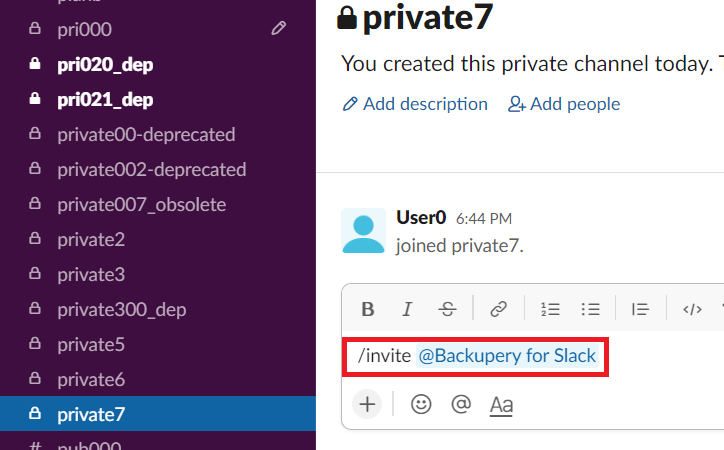
- Add the app to a conversation using the app settings. Alternatively, you can add the app to a channel using the app settings. Just click the application and then select Add this app to a channel…
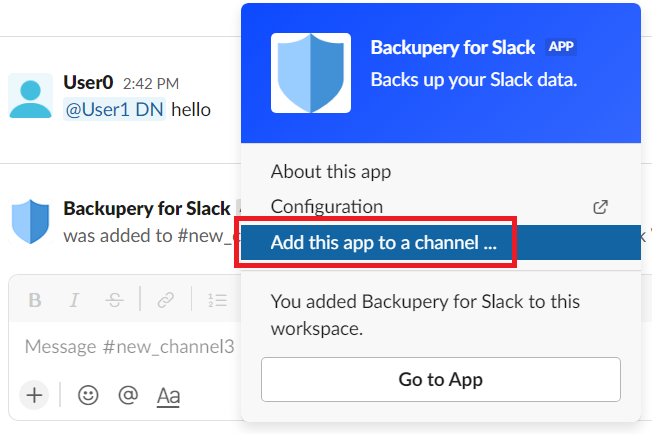
Please note, to make the app export a channel that is not available for the user who installed the app, it’s necessary to add the app to the channel by any other user who takes part in the channel.
Example. Assume there are User1, User2, and User3 on a workspace; User1 installs the Backupery for Slack app. There is also a private channel on a workspace so that User1 is not in the channel, but User2 and User3 are in the channel. To export the channel, it is necessary to add Backupery for Slack by User2 or User3, because User1 is unable to do that as the channel is simply not visible to the user.
So, let’s summarize. After proper setup, Backupery for Slack will export the following data:
1. Public & Private Channels/DMs where the installing user (the user who installed Backupery for Slack) participates.
2. Public & Private Channels/DMs of users who installed Backupery for Slack Assistant.
3. Private Channels where Backupery for Slack was manually added.
Once everything is set up, you are ready to go. Just press the Export now button and see how the app exports the data:
3. Convert and view exported data
Once the data exported, it may be presented in several formats. These settings are located on the Convert to What tab. We created a separate article on how to use these settings and how to view the results.
As always, if you have any questions, ideas, or suggestions, please contact us.
If you need any specific feature or want us to build a custom integration for your system – please let us know, we’ll be glad to help!
Hi Backupery team,
I’m currently doing an evaluation on behalf of Security team at BlueCat. Could you please let me know if the data that is exported from Slack being processed and stored on your end?
If so, what is the location? Have you obtained any security certifications in the past?
Looking forward to hearing back from you!
Hi Jelena and I’m sorry for the late reply!
Backupery for Slack Desktop works locally and all the data processing is done on your computer only, no third-party services are involved. In other words, Backupery never sends your exported/processed data anywhere, all processing is done on your machine.
We’re a pretty small team at this moment so we don’t have the formal security certifications (e.g. SSAE18 SOC 2 Type II, ISO 27001) yet.
Hope this helps. Please do not hesitate to let me know if you have any questions or concerns!
Why, if selected only one private channel for export, the log show extracting/downloading all company users?
Hey Richard,
The reason why it downloads the users is to display the usernames properly in the exported channels. Channel history contains only user IDs (like U042RRVT71A), not real names so to make it readable the app downloads users to be able to match the user IDs with real usernames.
This process can be optimized though – if you select a single channel to export, the application should download the users of this particular channel only. This will be implemented in the next version of the app and I hope it will be available soon!
Please let me know if you have any questions or concerns, I’d be happy to help.