Table of Contents
- General information
- The HTML2 directory (Comfortable HTML)
- The HTML directory (Detailed HTML)
- The ReadyToImport directory
- Downloadable example
1. General information
In this article, you will learn more about the data conversion settings for Backupery for Slack and Backupery for Slack Export applications. You will also see the example output produced by the apps as well as an explanation of how to read the exported messages and threads, how to access the downloaded files, and how to read the exports in general.
Backupery for Slack and Backupery for Slack Export are different apps. Backupery for Slack exports the data by downloading the messages and files directly from Slack. Backupery for Slack Export is an app to convert Slack Export archive (*.zip) to HTML formats and download files mentioned in the conversations.
Though the apps are different, they produce a very similar output.
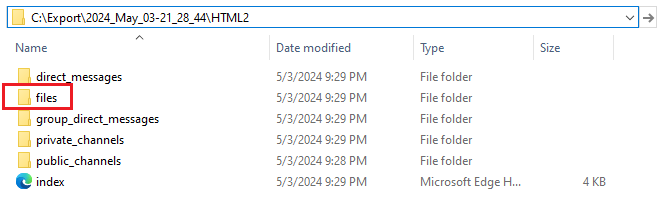
When the app starts processing data, it creates a new directory in your destination directory:
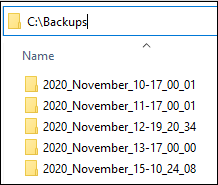
As you see, each directory is named by the following template: Year_Month_Date-Time-of-backup. For example, if processing was started on November 10, 2020, at 17:00:01 the name of the directory is 2020_November_10-17_00_01.
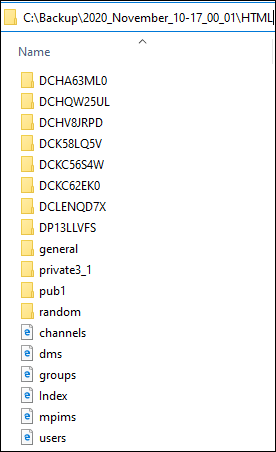
Usually, the apps produce several subdirectories in each backup directory (the exact number of directories may vary and depends on your settings):
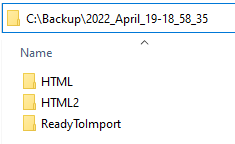
These subdirectories reflect the settings on the Convert to What tab:
- The ReadyToImport directory reflects the Slack Standard JSON Archive (.zip) option. The directory contains the exported data in JSON format that is possible to import to Slack if necessary. This directory is available for Backupery for Slack only.
- The HTML2 directory reflects the Comfortable HTML (.html) option and it contains the data exported in comfortable HTML format. This directory is used for a quick and comfortable review of the exported data. If you are not sure which HTML directory to choose, start with the HTML2 directory.
- The HTML directory reflects the Detailed HTML (.html) option and it contains the data exported in detailed HTML format. This directory is used for a deep, detailed analysis of the exported data and may not be easy to read.
A detailed description of each option and directory is below.
2. The HTML2 directory (Comfortable HTML)
2.1 The HTML2 directory structure
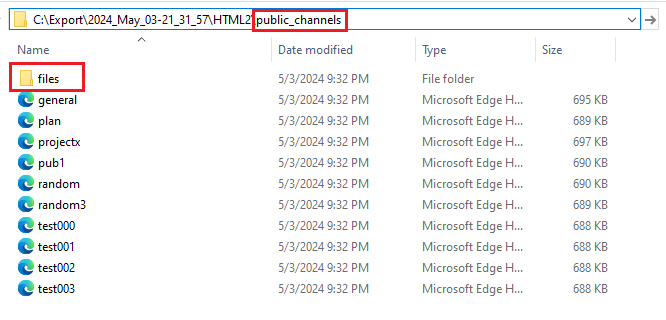
The HTML2 directory contains the exported data converted to comfortable HTML. This directory is used for a quick and comfortable review of the exported data. If you are not sure which HTML directory to choose, start with the HTML2 directory.
Below is the example of the directory:
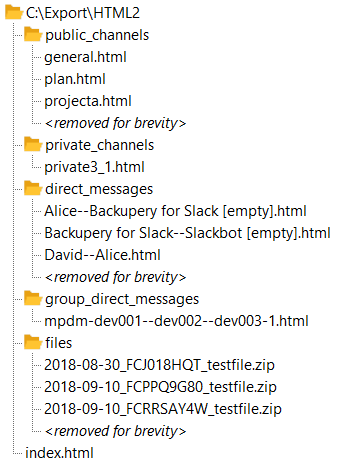
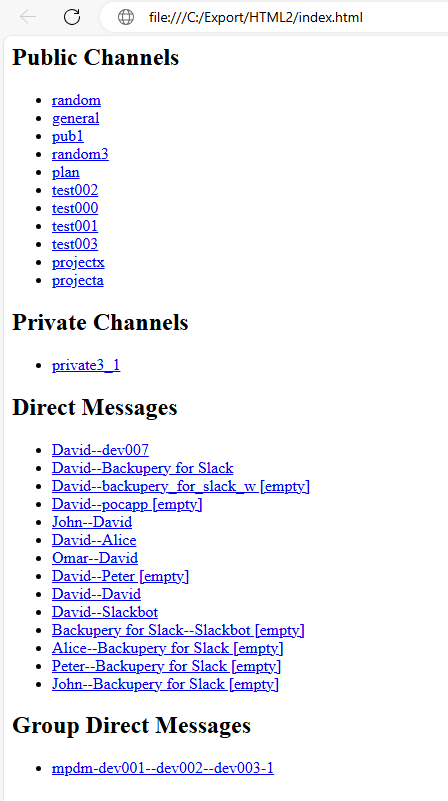
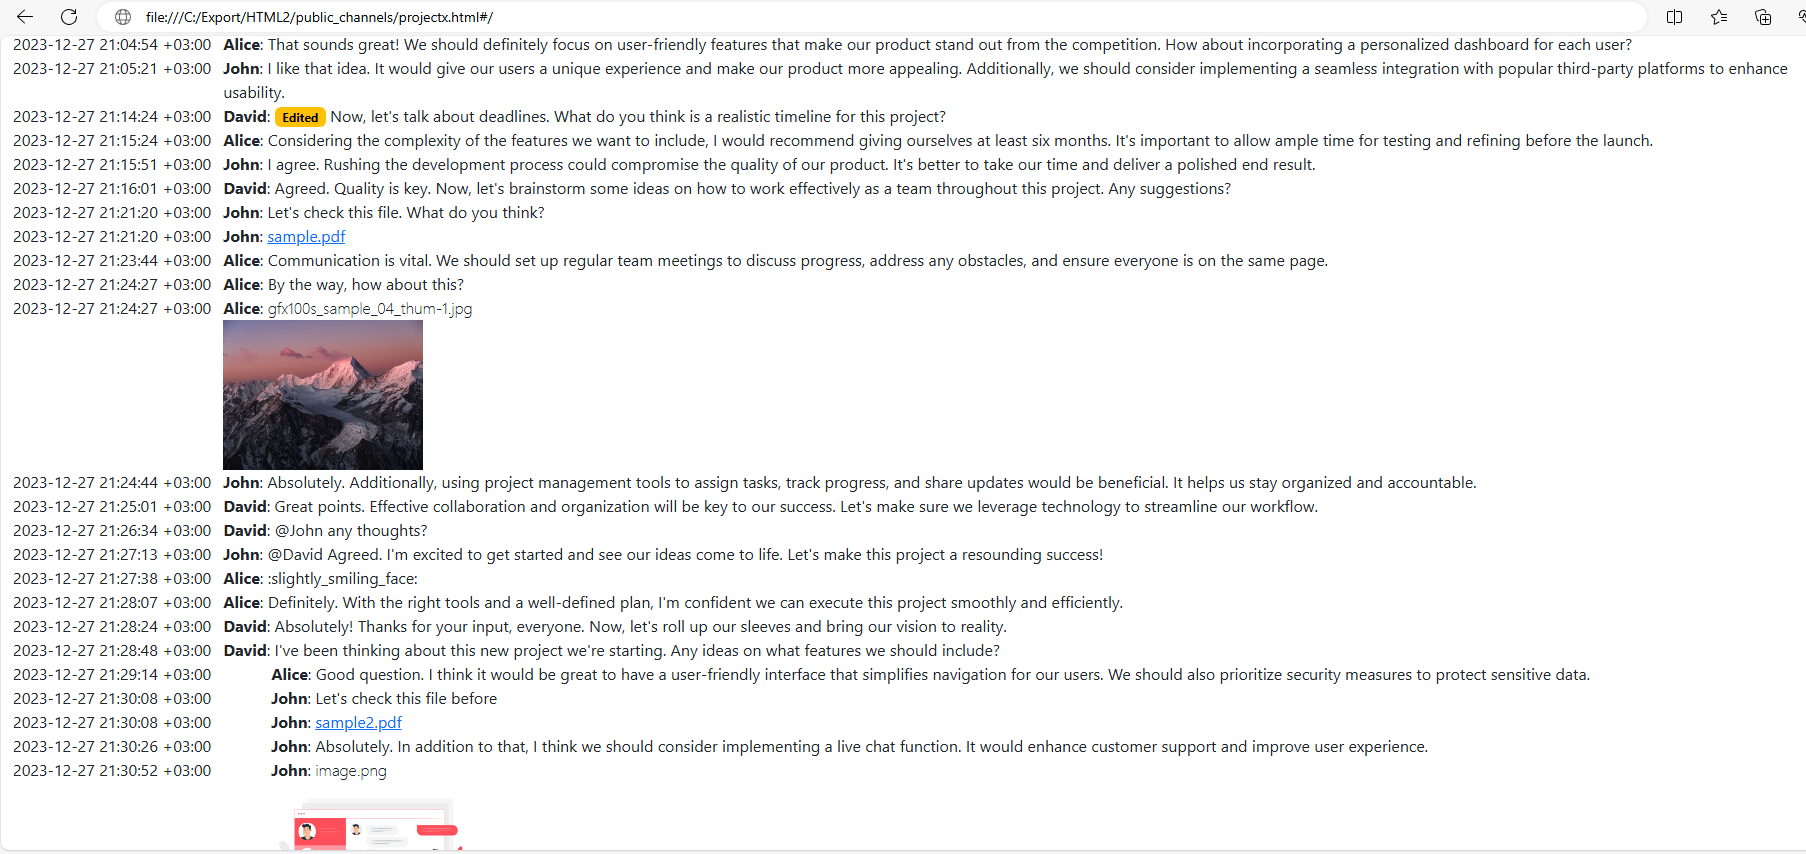
The directory contains the index.html file which is used as a starting point for browsing your export. Also, the directory contains several subdirectories which represent public and private channels, direct messages, group direct messages and the exported files. If you open the index.html file using any web browser, you will see a list of exported conversations, for example:
2.2 Downloaded files placement options
During producing the Comfortable HTML output, the application downloads files to a local directory on your computer. There are three possible options that control where the files will be placed:
- One file directory per a whole export (OneDirectoryPerExport). This is a default option and it places the files into a single directory on your backup destination:
- One file directory per each conversation type (OneDirectoryPerConversationType). This option places the files shared in a conversation of a specific type to the related subdirectory:
- One file directory per conversation (OneDirectoryPerConversation). This option places the files shared in a conversation to the related conversation subdirectory:
To change the file placement option just do the following:
- Close the running application using the system tray:
- Open the following directory:
C:\Users\<USERNAME>\AppData\Local\Backupery for Slack Export
or
C:\Users\<USERNAME>\AppData\Local\Backupery for Slack - Open the user.config file with any text editor.
- Change the <FilePlacement>OneDirectoryPerConversation</FilePlacement> option to one of the desired options (OneDirectoryPerExport, OneDirectoryPerConversationType, OneDirectoryPerConversation).
- Save the user.config file and run the app again.
2.3 How to read the exported messages and access the downloaded files
If you click any conversation, you will see a chronological list of the exported messages along with the files shared in the conversation:
Please note, the files are downloaded into the files directory. So if you click a file, you will access the locally downloaded file, not a remote file hosted in Slack.
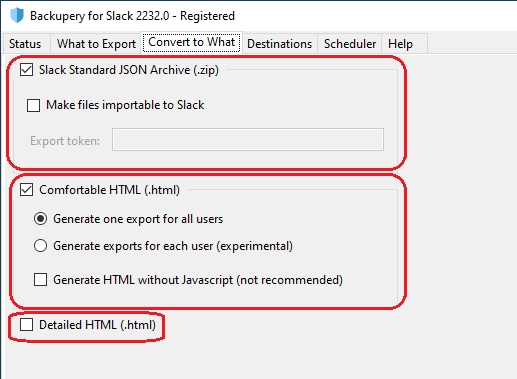
2.4 Export isolation ⚓︎
The app can generate two different HTML representations of the exported data: “All Users” and “Per User” representations, see the screenshot below.
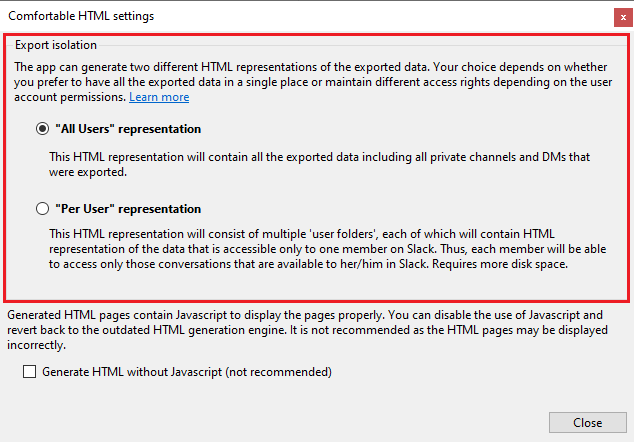
- “All Users” means that the conversations of different users will be placed into the same directory. For example, if there are 10 private channels on the workspace, all 10 exported private channels will be placed into a single directory no matter who can access them on Slack:
<your-backup-destination>/private_channels
The same is true for direct messages. All the exported direct messages will be placed into a single directory:
<your-backup-destination>/direct_messages
In other words, the “All Users” representation ignores user access rights. - “Per User” means that the HTML representation will consist of multiple “user folders”, each of which will contain the data that is accessible only to one user on Slack. For example, let’s say there are Alice, Bob and Carol on a Slack workspace. If the “Per User” mode is enabled, the app will generate the following structure on your destination:
<your-backup-destination>/Alice
<your-backup-destination>/Bob
<your-backup-destination>/Carol
where each directory will contain the conversations that are available to Alice, Bob and Carol respectively. For example, the Alice directory will have the conversations that are available for Alice on Slack:
<your-backup-destination>/John/public_channels
<your-backup-destination>/John/private_channels
<your-backup-destination>/John/direct_messages
so the “<your-backup-destination>/John/private_channels” directory will not contain private channels that are not accessible by John.
Use the “Per User” representation if you’re going to provide your users with an exact copy of the conversations they have on Slack. For example, if you want to provide John with his exact copy of the conversations on Slack, just send him the “John” directory. In other words, the “Per User” representation allows the owner of backup to maintain access rights for different users. Use the “All Users” representation if the data separation is not required.
Note, the “Per User” representation will occupy more disk space as the data may be duplicated for different users (each user will have the “general” channel for example).
3. The HTML directory (Detailed HTML)
3.1 The HTML directory structure
3.1.1 Overview
The HTML directory contains the data converted to detailed HTML. Please note, the directory is used for a deep, detailed analysis of the data and may not be easy to read. If you need more comfortable look through the messages, skip to the HTML2 directory (Comfortable HTML).
Below is the example of the directory:
This directory usually contains several files:
- users.html contains information about the exported users. Usually, this file has information about all users in a workspace.
- channels.html contains information about the exported public channels.
- groups.html contains information about the exported private channels.
- dms.html contains information about the exported direct messages.
- mpims.html contains information about the exported group direct messages.
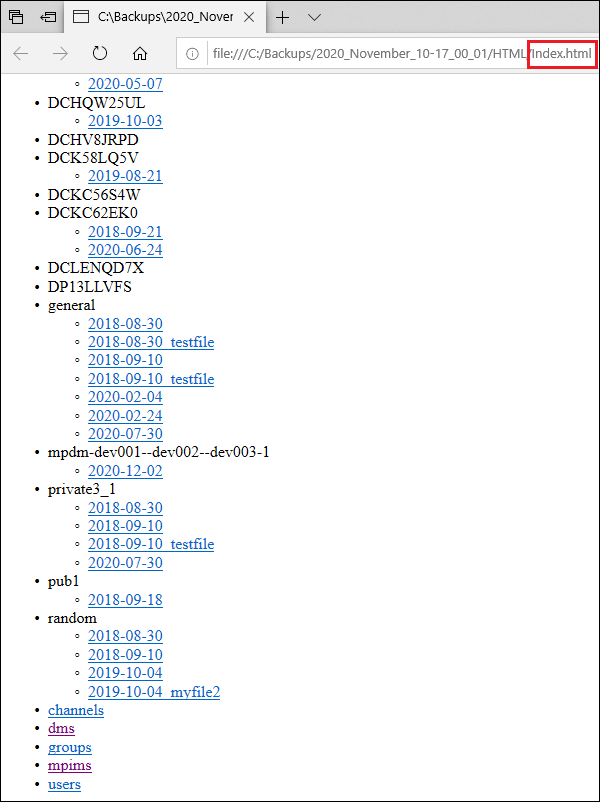
- Index.html is an index file that allows you to browse the Detailed HTML export. Think of it as a starting point to browse your data in a web-browser. Just double-click the file and you will see the Detailed HTML directory in your web browser:
Each subdirectory inside the HTML directory represents a channel (public or private), a direct message conversation, or a group direct message conversation and contains the messages and the downloaded files.
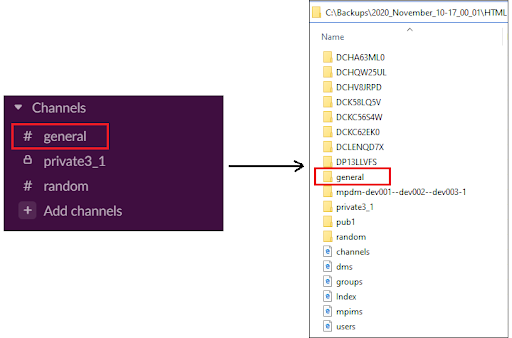
3.1.2 Public and private channels
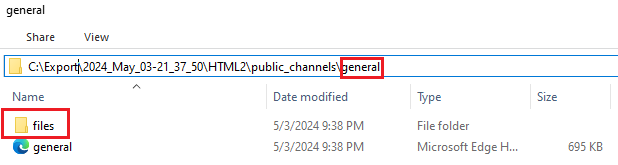
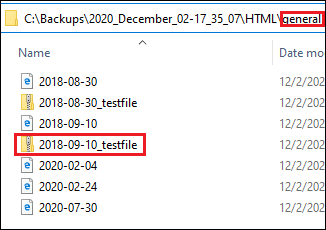
Usually, the name of a public or a private channel matches the name of a directory. For example, the channel named general is placed into the general directory:
3.1.3 Direct messages
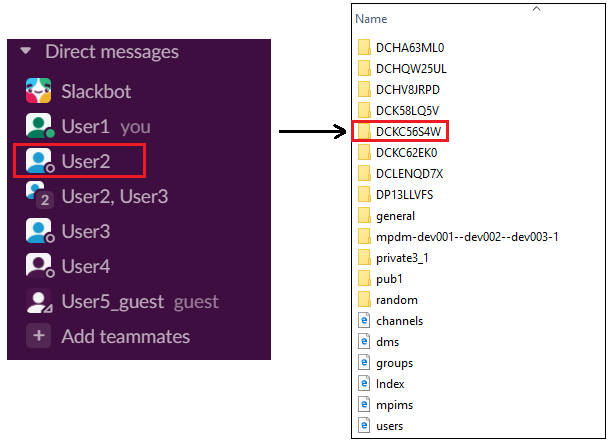
Direct messages are placed into the directories which start with “D”:
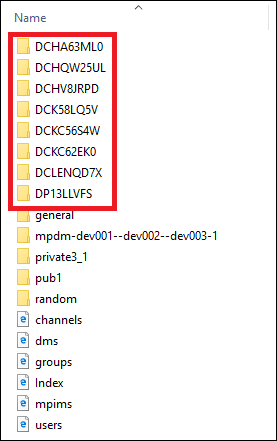
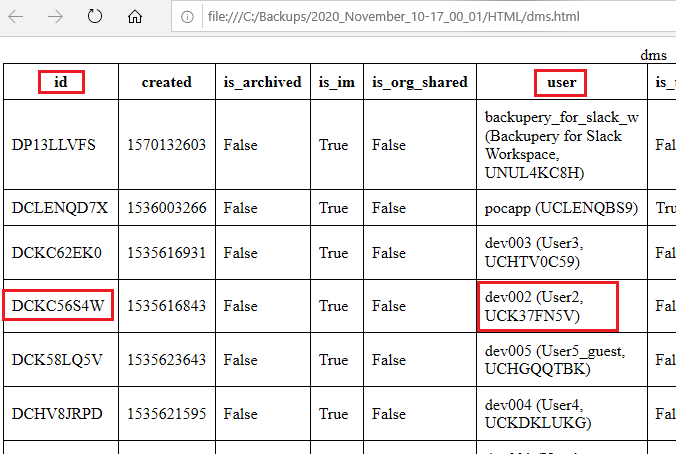
The names of these directories actually are IDs of the direct messages. If you need to find the ID of a specific DM with a user you should open dms.html and find the user name or handle in the user column. Then find the corresponding ID in the id column. For example, let’s find the DM conversation with a user whose name is User2:
3.1.4 Group direct messages
Group direct messages are placed into the directories which start with “mpdm-”:
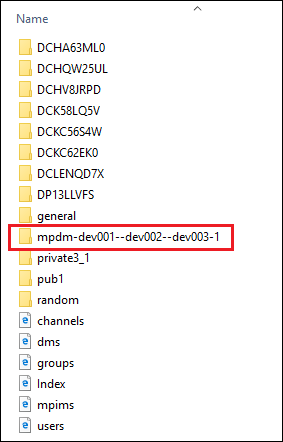
The names of these directories consist of the “mpdm-” prefix and handles of users who take part in the group joined with the “–” symbols. To find more information about the exported group direct messages you can refer to mpims.html.
3.2 How to read the exported messages and threads
First, you should choose the directory you want to read the messages from. In our example, let’s read the messages from the private channel named private3_1:
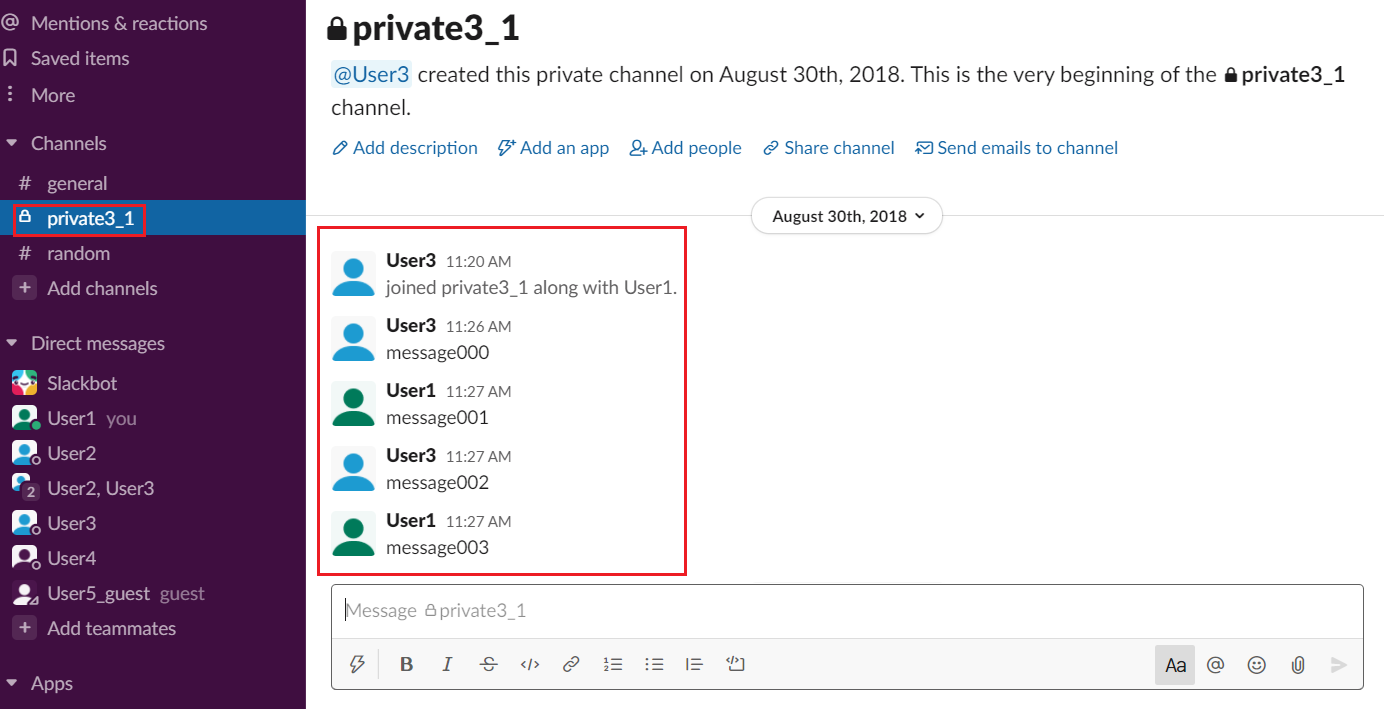
So let’s open the private3_1 directory and look inside it:
Each HTML file (2018-08-30.html, 2018-09-10.hml, and 2020-07-30.html) contains the messages for a given day. So to read the messages that were sent on August 30th, 2018 just open 2018-08-30.html:
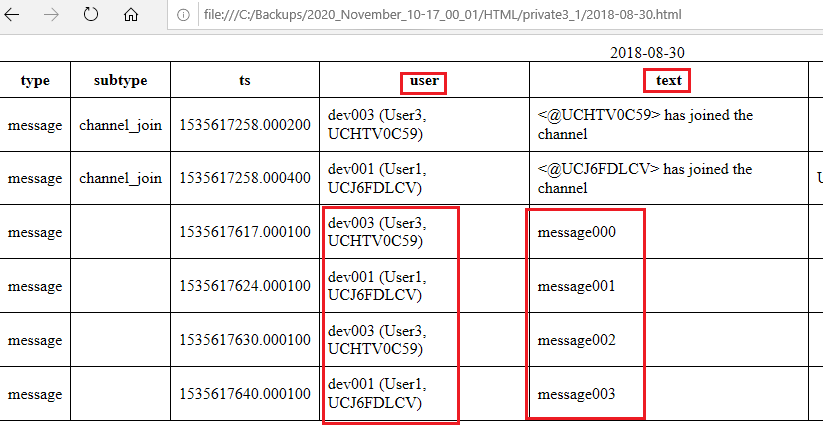
Message replies are represented as generic messages. For example, the following reply
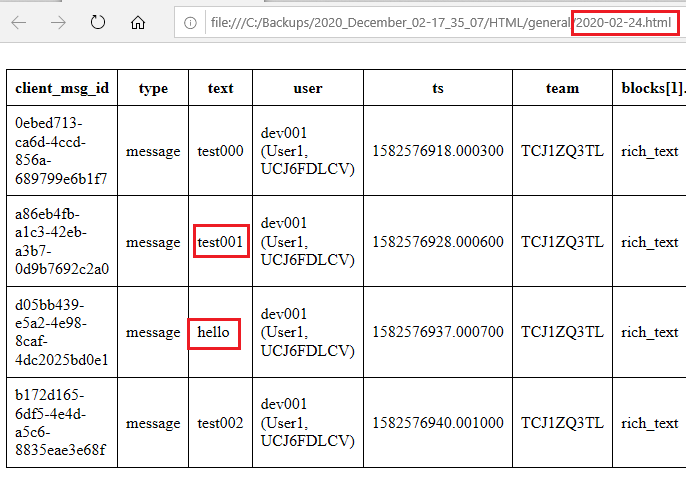
is placed into 2020-02-24.html as a generic message:
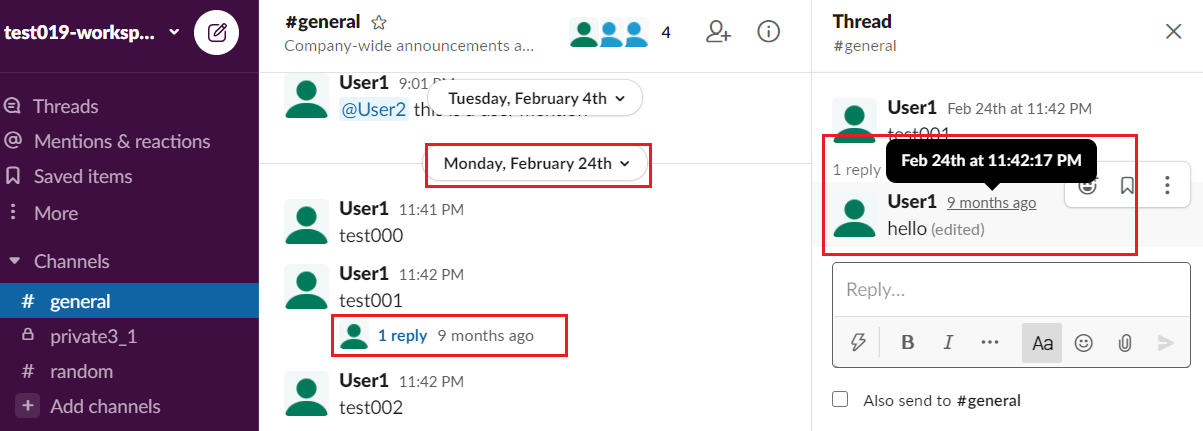
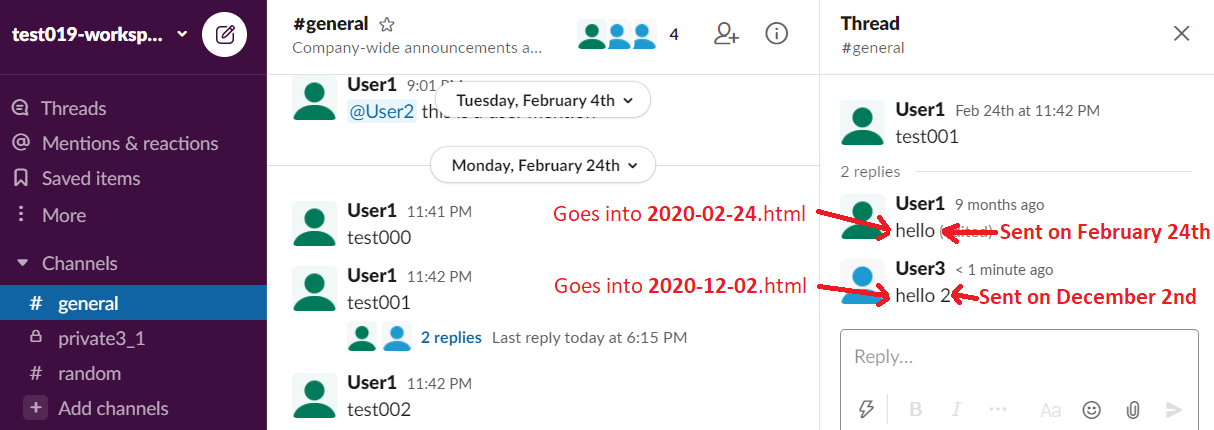
Please note, if a reply was sent on a day that differs from the day when the “parent” message was sent, then the reply is placed into the file which contains the messages sent on the day of the reply. For example, consider two replies to the “test001” message that was sent on February 24th, 2020:
- The “hello” reply was sent on the same day, February 24th, 2020.
- The “hello 2” reply was sent later, December 2nd, 2020.
The following screenshot illustrates the scenario:
So the “hello” is placed into 2020-02-24.html where the parent message “test001” lives, but the “hello 2” reply is placed into 2020-12-02.html.
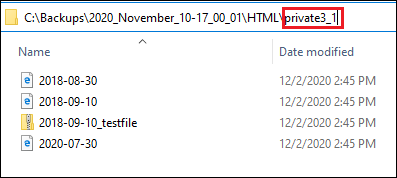
3.3 How to access the downloaded files
Downloaded files are placed into the related conversation directories. For example, all the files downloaded from the general channel are placed into the general directory. Each file name starts with a timestamp that represents the date when the file was shared in a conversation. For example, consider the following file upload in the general channel:
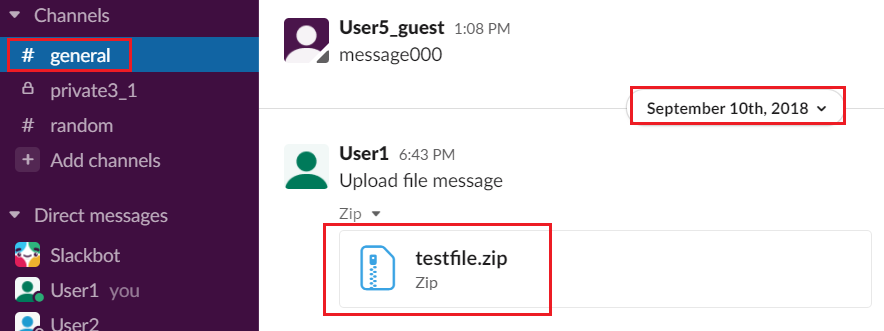
The downloaded file will be placed in the general directory and will be named 2018-09-10_testfile.zip.
4. The ReadyToImport directory
This directory is available for Backupery for Slack only.
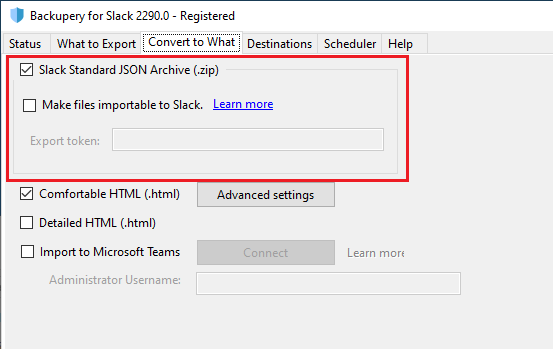
The ReadyToImport directory keeps a zip file that contains the exported data that is possible to import to Slack using Slack import tools: https://slack.com/intl/en-by/help/articles/204897248-Guide-to-Slack-import-and-export-tools.
This output format is controlled by the “Slack Standard JSON Archive” option:
The produced zip file format is similar to the Slack-standard export file, so you can read the file using the information from the following article: https://slack.com/intl/en-by/help/articles/220556107-How-to-read-Slack-data-exports.

In general, the zip file contains all the data exported from Slack including information about users, channels, direct messages, and group direct messages, private & public channels history, direct messages history, and so on. It does not contain the files, however, so the zip file size is relatively small.
4.1 Make files importable to Slack
The zip archive can be imported to a Slack workspace using their Slack import tool. If you leave the Make files importable to Slack option unchecked, you may notice that the imported files are not available in the workspace so if you try to download any of the files, you’ll get an invalid file. Here is why.
If you unzip the produced archive and review any JSON file that contains the messages you will also notice that some messages contain links to uploaded files:
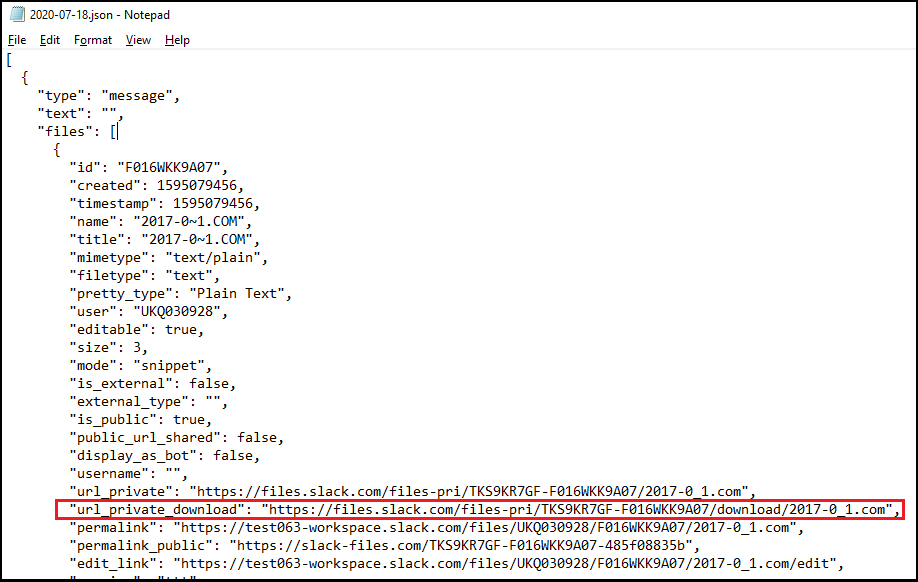
During the import, the Slack Import Tool tries to access the file using the “url_private_download” link. If the tool is able to access the file using the link, it imports the file into the destination workspace. However, the link works properly only if it contains an additional parameter which is called “file download token”. So the valid link looks like this:
where “xoxe-426…<…>” is the file download token.
Backupery for Slack is not able to generate the token automatically, so if you want to make your files available in a destination workspace, you should provide the token to the app, here is how:
- Export the source workspace using Slack native export tool.
- Download the export archive and unzip it.
- Search for the “xoxe” string inside the unzipped archive. The token always starts with the “xoxe” prefix.
- Check the Make files importable to Slack option and input the token:
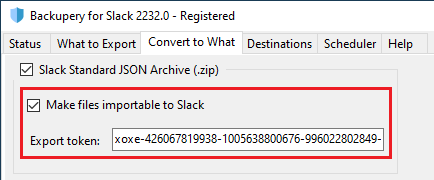
- After producing a new zip archive, the files should be importable to Slack.
5. Downloadable examples
- Backupery for Slack: you can download the export from an example workspace that was used in this article here.
- Backupery for Slack Export: you can download the processed example archive here.
If you have any questions, ideas, or suggestions, please contact us!